
Shower grout, those thin lines of mortar between your tiles, is one of the hardest-working surfaces in your bathroom. It’s also one of the first places mold, mildew, and soap scum set up shop. If you’ve stared at dark, dingy grout lines and wondered what actually works to clean them, you’re not alone. The good news? There’s a grout cleaner solution for nearly every budget and preference, from commercial-strength products to pantry staples you probably already have on hand. This guide walks you through the best shower grout cleaner options, how to use them effectively, and how to keep your grout lines looking fresh long-term.
Table of Contents
ToggleKey Takeaways
- The best grout cleaner for your shower depends on your budget and tile type—oxygen-based options offer a safer middle ground between gentle and effective, while bleach works faster but requires careful dilution and ventilation.
- Baking soda mixed with white vinegar creates an effective DIY shower grout cleaner that uses a fizzing reaction to lift grime without harsh chemicals or expense.
- Proper technique matters more than the product itself: apply cleaner, let it dwell for 5–15 minutes to break down stains, scrub gently with a stiff brush, and rinse thoroughly to prevent residue buildup.
- Running your exhaust fan for 30 minutes after showers and squeegeeing moisture away immediately prevents mold and mildew from establishing in grout lines, reducing cleaning frequency by up to 50%.
- Applying a penetrating grout sealer after cleaning blocks water and stains from penetrating porous grout, keeping lines bright longer and extending the life of your tile installation.
Why Shower Grout Needs Regular Cleaning
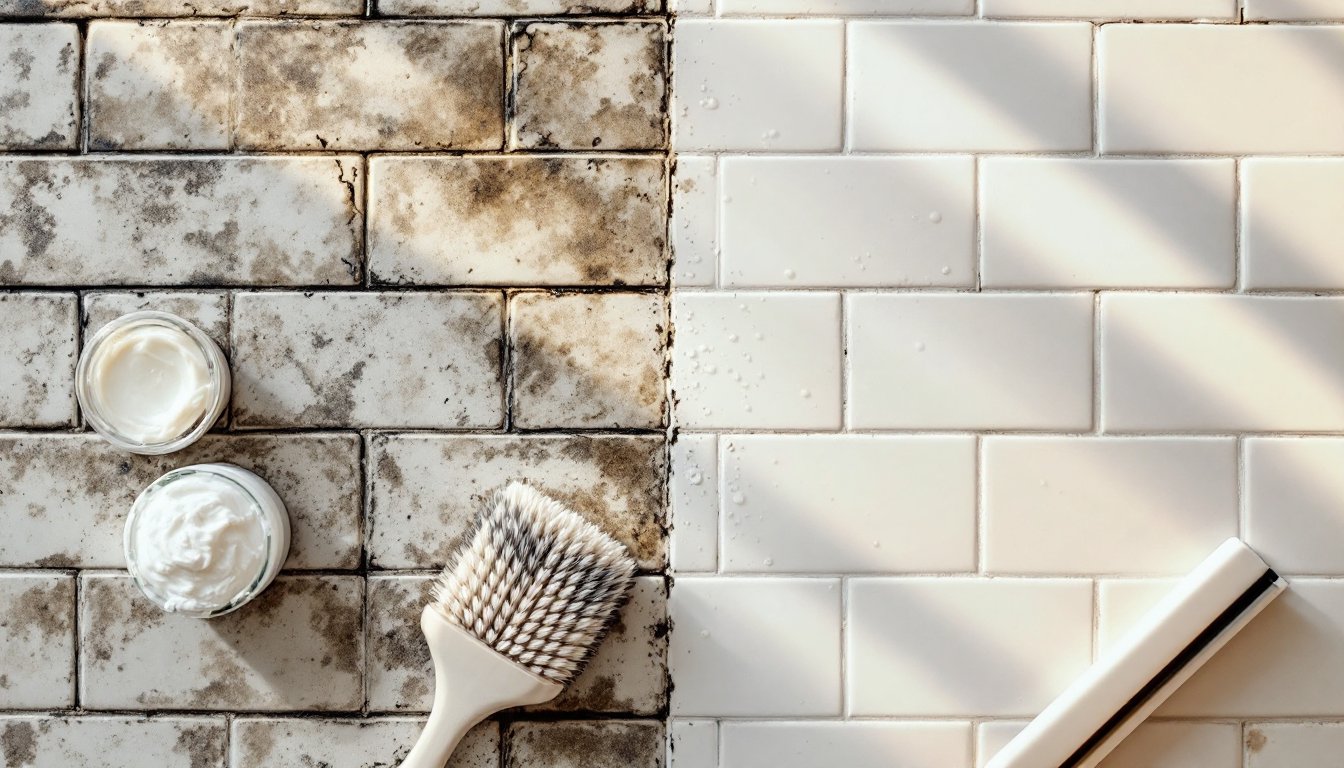
Your shower is the perfect breeding ground for grime and biological growth. The combination of moisture, warmth, soap residue, and limited airflow creates an ideal environment for mold and mildew to colonize grout lines. Unlike tile surfaces, which you wipe down regularly, grout is porous, it absorbs water and organic material.
Over time, this buildup darkens the grout and can damage it structurally if left unchecked. Mold penetrates the porous grout matrix and weakens it from within. Regular cleaning with a good shower tile grout cleaner prevents this breakdown and extends the life of your tile installation.
The best shower grout cleaner catches problems early, before they require regrouting, a labor-intensive (and expensive) repair. Weekly or bi-weekly cleaning with a shower grout cleaner keeps lines bright and prevents mold and mildew from establishing a foothold. Even light maintenance beats the alternative of scrubbing heavily stained grout or replacing it altogether.
Top Commercial Grout Cleaners That Actually Work
Commercial grout cleaners come in several formulas, each with strengths and trade-offs. When shopping for the best shower tile and grout cleaner, read the label carefully, what works brilliantly on white ceramic tile in a commercial bathroom might be overkill (or damaging) on natural stone in a small residential shower.
Oxygen-Based and Bleach-Based Options
Oxygen-based cleaners are popular for good reason. They use hydrogen peroxide or similar oxidizing agents to break down organic stains without the harsh fumes or toxicity of bleach. Popular brands in this category include OxiClean and specialized grout cleaners that list oxygen as the primary active ingredient. These are safer for regular use and gentler on grout sealer if you’ve applied one.
Bleach-based shower grout cleaners work faster on heavy mold and mildew because chlorine is a powerful biocide. But, bleach is caustic, requires ventilation, and can damage grout sealer or discolor certain tile types. If you go the bleach route, dilute it properly (typically 1 part bleach to 10 parts water), wear gloves and eye protection, and ensure your bathroom is well-ventilated.
For most homeowners, a best shower grout cleaner falls somewhere in the middle: an oxygen-based commercial product or an acid-based cleaner (like those containing citric acid) that cuts through soap scum and light mineral deposits without the aggressiveness of bleach. Check that any commercial product you choose is safe for your specific tile type, some acidic cleaners can etch natural stone or marble.
DIY Grout Cleaning Solutions You Can Make at Home
Not everyone wants to buy commercial products, and frankly, you don’t need to. Common household items make surprisingly effective grout cleaners for shower tiles.
Baking Soda and Vinegar Method
This is the workhorse DIY approach. Mix baking soda with white distilled vinegar to form a thick paste, start with 1 part vinegar to 3 parts baking soda, then adjust consistency as needed. The reaction between the alkaline baking soda and acidic vinegar creates a fizzing action that lifts grime without scrubbing your hands raw.
Apply the paste directly into grout lines with an old toothbrush or a small grout brush. Let it sit for 5–10 minutes. The longer you wait, the more time the mixture has to break down buildup, but don’t leave it for hours, vinegar is mildly acidic and prolonged contact can eventually soften grout (especially if it’s old or already compromised).
Scrub gently with a stiff-bristled brush. This combination handles moderate soap scum and light to moderate mold effectively. For stubborn stains, switch to a grout cleaning brush with stiffer nylon or brass bristles, brass won’t damage grout the way steel wool can.
Another DIY option is baking soda mixed with hydrogen peroxide and a drop of dish soap. This creates a gentler oxidizing paste similar to commercial oxygen-based cleaners. Use the same application method: paste, wait 5–10 minutes, scrub, rinse thoroughly with clean water.
Step-by-Step Application Tips for Best Results
Success with any shower tile grout cleaner, whether commercial or DIY, comes down to technique and preparation. Here’s the process that actually works:
Before you start: Ventilate your bathroom by opening windows and turning on the exhaust fan. If using bleach or commercial cleaners, wear rubber gloves, safety goggles, and ensure airflow. If you have respiratory sensitivities, a dust mask rated for chemical vapors (like an N95 upgraded to P100) is worth the investment.
Step 1: Rinse the shower. Spray down the tile and grout with warm water. This removes loose debris and preps the surface for cleaner contact. Don’t leave standing water, you want damp, not soaked.
Step 2: Apply your cleaner. For commercial products, follow the label instructions, some spray on and sit for a few minutes, others need immediate scrubbing. For DIY paste, work it into grout lines with a small brush or old toothbrush, pressing it in firmly so it contacts the porous grout.
Step 3: Let it dwell. Dwell time is critical. Most cleaners work better when they have 5–15 minutes to chemically break down stains. Don’t skip this step thinking extra scrubbing will compensate.
Step 4: Scrub with a stiff brush. Use a grout brush or old toothbrush with firm, short strokes along the grout lines. Avoid steel wool on grout, it sheds fibers that can rust and stain. Brass or nylon bristles are safer.
Step 5: Rinse thoroughly. Flush the area repeatedly with clean water until no cleaner residue remains. Residual cleaner left on grout can discolor it or compromise sealer. Recent research on bathroom cleaning practices shows that thorough rinsing after chemical application is one of the most overlooked steps, yet it directly impacts both the appearance and longevity of grout.
Step 6: Dry the grout. Use a clean cloth or squeegee to remove excess moisture. This prevents fresh water from reactivating stain-causing minerals and allows you to see the true results of your cleaning.
Preventing Future Grout Stains and Discoloration
Cleaning grout is necessary, but prevention is easier. A few proactive habits dramatically reduce the frequency you’ll need to scrub.
Improve airflow. Run your exhaust fan during and for 30 minutes after showers. If you don’t have one, install one, inadequate ventilation is the #1 driver of bathroom mold. Cracking a window also helps.
Apply grout sealer. After cleaning, consider sealing your grout with a penetrating sealer (not a surface sealer, which peels and traps moisture). Quality grout sealers block water and stain-causing molecules from penetrating the porous grout. Reseal every 1–3 years depending on your sealer and bathroom humidity. Many homeowners report that sealed grout stays bright far longer and requires less aggressive cleaning when maintenance is needed.
Squeegee or wipe after showers. Removing standing water immediately after use prevents mineral deposits and reduces the moisture mold and mildew need to thrive. This single habit can reduce mold growth by 50% or more.
Clean spills quickly. Soap scum, shampoo, and body products leave residue on grout. Spray and wipe down your shower walls weekly with a light bathroom cleaner or diluted vinegar to prevent buildup.
Keep shower products organized. Bottles sitting on shelves trap moisture against grout. Use a corner caddy or shelf riser that allows air circulation underneath. For additional inspiration and tips on maintaining other bathroom surfaces, resources like The Spruce provide comprehensive guidance on bathroom upkeep and cleaning strategies.
Check for water leaks. Grout discoloration can signal a leak behind the tile. If you notice dark stains that don’t respond to cleaning or keep recurring in the same spot, investigate the wall cavity behind the tile. Persistent moisture there requires professional repair to prevent structural damage.